

A metal detector can make a lot of noise without making much sense. One signal leads to a decent coin, the next produces a rusty nail, and another disappears before the coil has even passed over the spot again. After a few sessions, it is easy to wonder whether the machine is giving useful information or simply making random noises.
Learning how to read metal detector signals changes that. The difference between digging every beep and making a sensible decision before reaching for the trowel is usually experience with tone, target ID, and signal behaviour. Those things can look confusing at first, but they follow patterns once you know what to listen for.
This guide explains those patterns in plain English, from low iron grunts and high coin tones to the numbers appearing on the display. It also covers why the same coin can produce different readings, how to test a questionable signal, and why consistency is often more useful than any single number. If the basics of operating the machine still feel unfamiliar, the beginner’s guide to using a metal detector is a useful place to start before working deeper into signal interpretation.
A metal detector signal is the machine’s response when its electromagnetic field encounters a metal object in the ground. The detector sends an electromagnetic field into the soil; the metal object affects that field, and the machine processes the returning response into an audio tone, a target ID number, or both. Different metals respond differently because they have different electrical conductivity and magnetic properties, which is why iron, silver, copper, and aluminium do not normally sound identical.
That difference is useful because the machine is effectively giving clues about what may be underneath the coil. A Victorian copper penny can produce a strong, repeatable response, while an iron nail may give a low grunt that breaks or changes as the coil passes over it. The useful part is that these clues work together, so the next thing to understand is why even the same object can behave differently from one sweep to another.
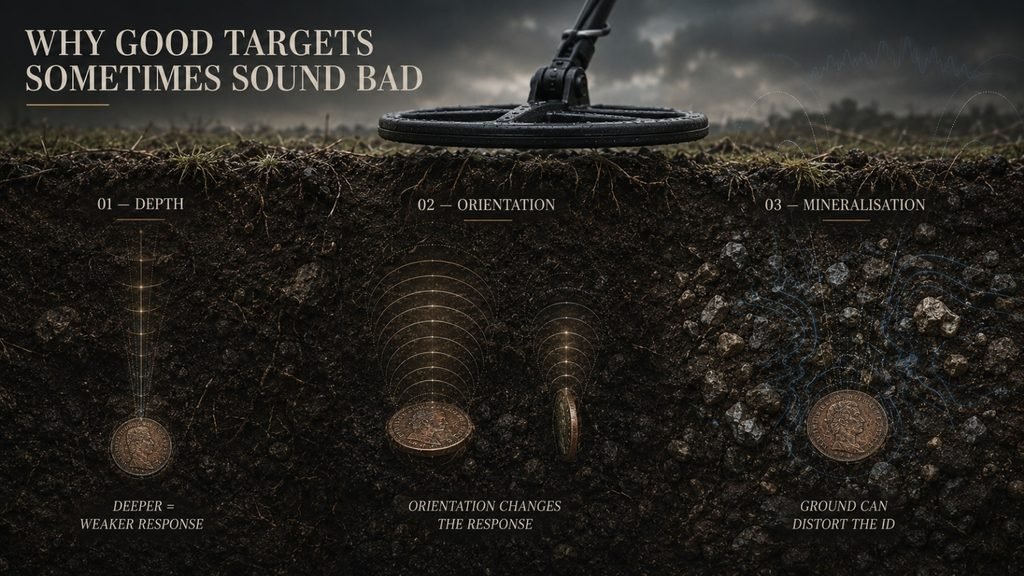
The same buried coin does not necessarily produce exactly the same signal every time. Depth affects signal strength, so a deeper target usually gives a weaker and potentially less stable response than a shallow one, while mineralised soil can introduce background noise that interferes with the reading. Target orientation matters too, because a coin lying flat can respond differently from the same coin standing on its edge.
Sweep technique also has an effect. Moving the coil too quickly can give the detector less time to process a target, while changing the coil height between passes can make an otherwise stable response seem inconsistent. These variables explain why a signal should be treated as information rather than a guaranteed identification, which leads directly to the most obvious part of that information: the sound.
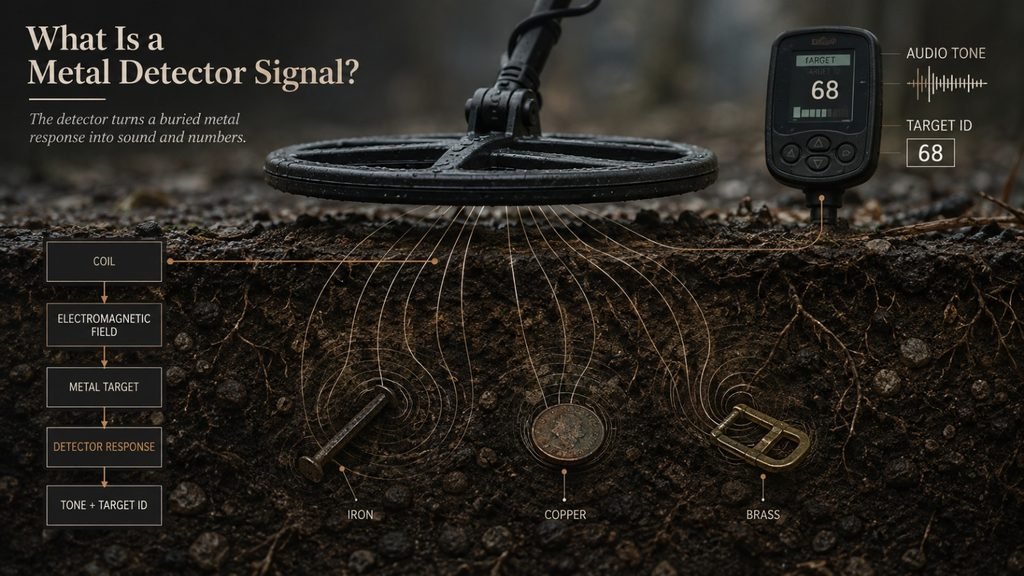
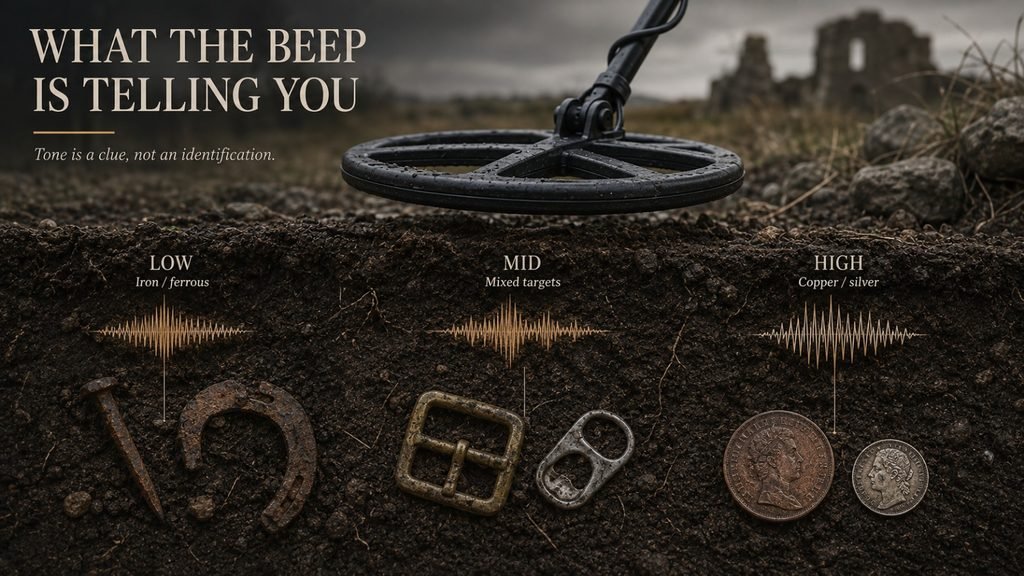
Most modern metal detectors use different audio tones to give an indication of a target’s conductivity, with low tones generally associated with iron, mid tones with mid-conductivity targets, and high tones with higher-conductivity targets such as many silver and copper coins. Learning these sounds is useful because experienced detectorists can often make an initial judgement from the audio before even looking at the screen. Garrett also explains the role of audio tones and other detector readouts in Garrett’s guide to reading metal detector signals, which is worth reading alongside the practical advice here.
A low grunt, growl, or dull tone usually indicates iron or another ferrous target. Iron nails, old horseshoes, wire, agricultural debris, and fragments of rusted metal are common examples, particularly on UK farmland that has been worked for generations. That does not mean every low tone should automatically be ignored, because historically important iron objects can produce exactly the sort of signal that beginners learn to reject.
The useful skill is recognising the sound rather than making an automatic decision. A clean low tone that stays firmly in the iron range is often not worth stopping for on an ordinary detecting session, but a broken or unusual response may deserve another look. That distinction becomes clearer once mid tones are understood, because this is where some of the more difficult targets begin to overlap.
Mid tones are often the trickiest because they can represent a wide mixture of targets. Bronze, brass, aluminium, lead, ringpulls, and some small gold jewellery can all fall into this general area, so there is no single object that can be identified simply from hearing a mid tone. A brass buckle and an aluminium ringpull can therefore give surprisingly similar responses.
Gold makes this range particularly interesting. Small gold rings, earrings, and other jewellery can produce mid-range responses, meaning that ignoring everything below a high silver-like tone can result in genuine finds being left in the ground. The next step is therefore to combine the tone with the target ID rather than relying on pitch alone.
A high, clear tone generally indicates a higher-conductivity target, which can include silver coins and larger copper objects. Hammered silver, milled silver, Victorian silver, Georgian copper coins, and other substantial copper targets can all produce strong high responses depending on their size, condition, orientation, and depth. The sound itself is useful, but its quality matters just as much as its pitch.
A crisp tone that repeats cleanly as the coil crosses the target is more encouraging than a high tone that appears for a fraction of a second and then vanishes. A good high signal is not automatically a silver coin, but a clear and repeatable response gives a good reason to investigate. That becomes even more useful when the detector has an iron audio setting.
Many detectors offer an iron audio or ferrous audio function that allows iron to remain audible instead of being completely silenced by discrimination. On iron-heavy UK farmland, this can be useful because the detectorist can hear the low grunt while still listening for a better tone mixed into it. A coin close to an iron nail may therefore produce a low grunt followed by a higher response rather than sounding like a single confusing target.
This is particularly valuable around old farm buildings, field edges, paths, and other areas where iron debris has accumulated. Hearing the iron instead of completely removing it from the audio can reveal that another target is sitting nearby. That leads naturally to the second major part of signal interpretation: the number on the screen.
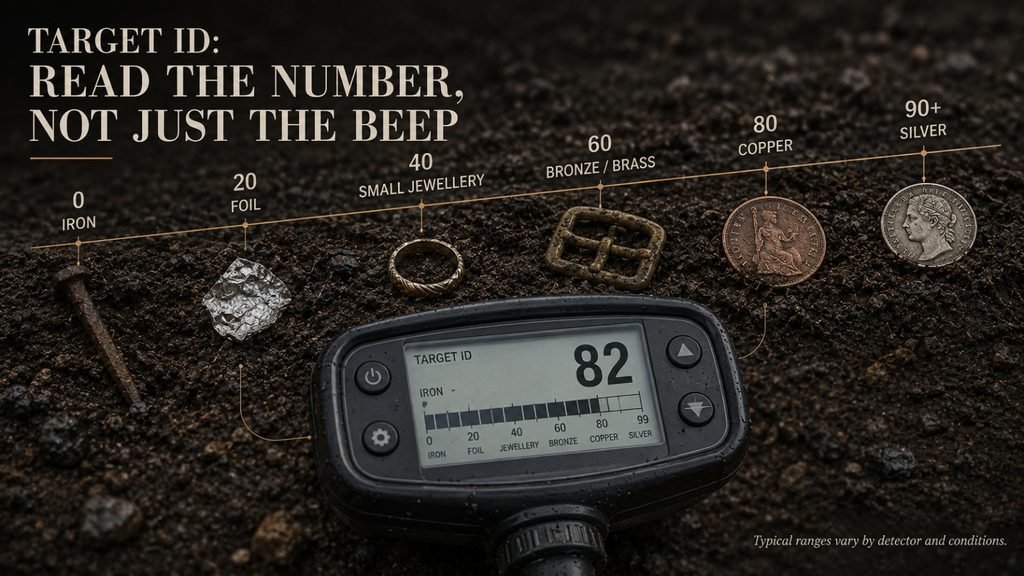
Target ID is a number displayed by the detector to indicate where a target appears to sit on the machine’s conductivity scale, commonly represented as 0 to 99 on many modern detectors. Lower numbers generally indicate less conductive or ferrous targets, while higher numbers generally indicate more conductive targets. The number is useful for narrowing down possibilities, but it should never be treated as a guaranteed identification because depth, soil, orientation, and nearby metal can all affect the reading.
A useful general reference on a 0 to 99 scale looks like this:
| Target Type | Typical ID Range (0 to 99 scale |
| Iron nails and ferrous debris | 0 to 15 |
| Foil and thin lead | 15 to 25 |
| Small gold jewellery and ringpulls | 28 to 45 |
| Bronze and brass mid-conductivity | 45 to 65 |
| Large copper coins and bronze | 65 to 85 |
| Victorian and Georgian copper pennies | 75 to 85 |
| Silver coins, hammered and milled | 80 to 95 |
These ranges provide a starting point rather than a promise about what will be found. A target near the middle of the scale could represent several different metals, while two objects made from the same material can produce different numbers because their size and shape are different.
A Victorian or Georgian copper penny will generally sit in the higher part of the scale, while iron nails and small ferrous fragments sit much lower. Silver coins also tend to produce high target IDs, although the exact reading depends on the detector and the conditions around the target. Small gold jewellery is a good reminder that target ID is not simply a scale from rubbish at the bottom to valuable finds at the top.
The overlap between target types is why a number should always be considered alongside the tone. A target ID in the mid range with a clean, repeatable tone is more interesting than the same number appearing alongside a broken, scratchy response. The next complication is depth, because the number on the screen can become less reliable as the target gets deeper.
A deep target can produce a lower or less stable ID than the same object closer to the surface. A silver hammered coin that gives a strong high reading when shallow may produce a much less impressive number when it is deeper, because the returning signal is weaker and the detector has less information to work with. This is one reason a deep target should not automatically be dismissed because the number looks lower than expected.
Aggressive discrimination can make this problem worse if higher-value targets are being accepted only above a particular ID threshold. A deep coin may fall below that threshold even though the object itself is highly conductive. Keeping this limitation in mind makes the display much more useful, because it becomes a clue rather than a final verdict.
Things become particularly interesting when two objects are close together. An iron nail beside a coin can produce a confused or bouncing ID because the detector is receiving responses from both objects at nearly the same time. The screen may move between low and high numbers instead of settling on one clear reading, and beginners often take that instability as proof that the target is rubbish.
That is not always the case. A mixed signal can mean iron masking a better target, especially on old farmland where nails and other ferrous debris are common. Learning to recognise this possibility makes signal consistency even more important, because the behaviour of the response can tell more than one isolated number.
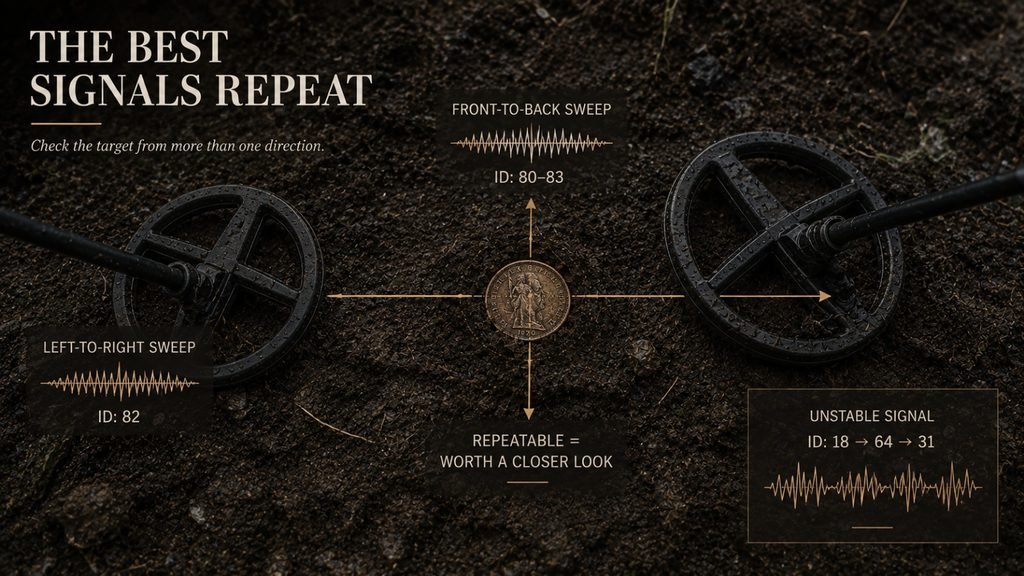
Signal consistency is one of the most useful indicators of a genuine buried target. A real object will usually produce a repeatable response when the coil passes over it from multiple directions, although deep, small, or differently positioned targets can be less stable. Looking for a repeatable tone and broadly similar target ID is therefore more reliable than trusting one impressive beep.
Once a promising signal appears, stop and work the exact area rather than continuing to walk. Sweep the coil over the spot several times, listen to the tone, and watch how the number behaves before deciding what to do next. That simple pause often turns a confusing response into something much easier to interpret.
Start by sweeping across the target from the same direction several times. Listen for whether the tone appears in roughly the same place and check whether the ID remains within a similar range. Then rotate approximately 90 degrees and sweep across the same spot again, because a genuine target will often remain detectable from both directions.
A signal that disappears completely when the sweep direction changes may be an awkward piece of iron, ground noise, or a very small target. A clean response that remains present from both directions deserves much more attention. Once this habit becomes automatic, it becomes easier to decide which signals deserve a recovery hole and which can safely be left behind.
A scratchy or irregular signal can have several explanations. It may come from a very small object, a corroded piece of metal, two targets sitting close together, or a deep target that is only just within the detector’s detection range. None of those possibilities guarantees a worthwhile find, but an unusual response is worth understanding before it is dismissed.
Discrimination settings also affect what reaches the headphones, so changing those settings can change the way a questionable target sounds. The metal detector discrimination guide explains how discrimination affects which signals are accepted or rejected and why lower discrimination can be useful in iron-heavy ground. With that in mind, a confusing signal may be telling you something about the settings as well as the object below the coil.
Getting Confusing Signals You Cannot Work Out?
Sometimes the issue is the ground rather than the technique. Heavily mineralised UK soil, iron-dense farmland, and wet beach conditions can all produce signals that are difficult to interpret, even when the detector is working correctly. If a specific site or signal pattern is consistently confusing, the team at UK Metal Detectors is happy to talk through what might be happening and whether a different approach or machine setup would help.
Signal consistency is useful, but the ground underneath the coil can make even a good target behave differently. Soil mineralisation, target depth, orientation, coil height, and nearby metal can all influence what reaches the detector’s electronics. Understanding those variables makes an unstable signal much less frustrating because there is usually a reason behind the behaviour.
Some UK soils contain minerals that respond to a detector’s electromagnetic field and create a background response of their own. Cornwall, Wales, parts of the Midlands, and areas of Northern England can present challenging ground conditions, while wet sand on beaches can create another set of problems. Mineralisation can make the detector noisier, shift target IDs, and sometimes make a weak target harder to hear clearly.
Ground balance helps the detector account for the soil response rather than treating everything coming from the ground as a potential target. The metal detector ground balance guide explains how ground balance works and why getting it right can improve stability in difficult soil. Once the ground response is under control, the remaining target signals are much easier to judge.
A deeper target normally produces a weaker response than a similar object closer to the surface. A shallow Victorian penny can give a strong, confident tone and a stable ID, while a deeper example may sound quieter and produce a number that moves around more. That does not automatically mean the deeper target is poor, because the weaker response may simply be a result of distance.
Quiet signals deserve a little patience, especially on sites with a history of older finds. A detectorist who only digs loud, perfect signals will naturally miss some targets that are deeper or poorly positioned. The next factor to consider is orientation, which can make a surprisingly large difference to signal strength.
A coin lying flat in the ground can produce a stronger response than the same coin standing vertically on its edge. The detector is interacting with a different amount and orientation of metal, so the resulting signal can change in both strength and quality. This is one reason an apparently exhausted site can still produce finds when searched carefully from different directions.
A target that is difficult to hear from one direction may become clearer from another. Slow, controlled sweeps give the detector more opportunity to respond to these awkward targets. That careful approach becomes especially useful once a promising signal has been identified and it is time to recover it.
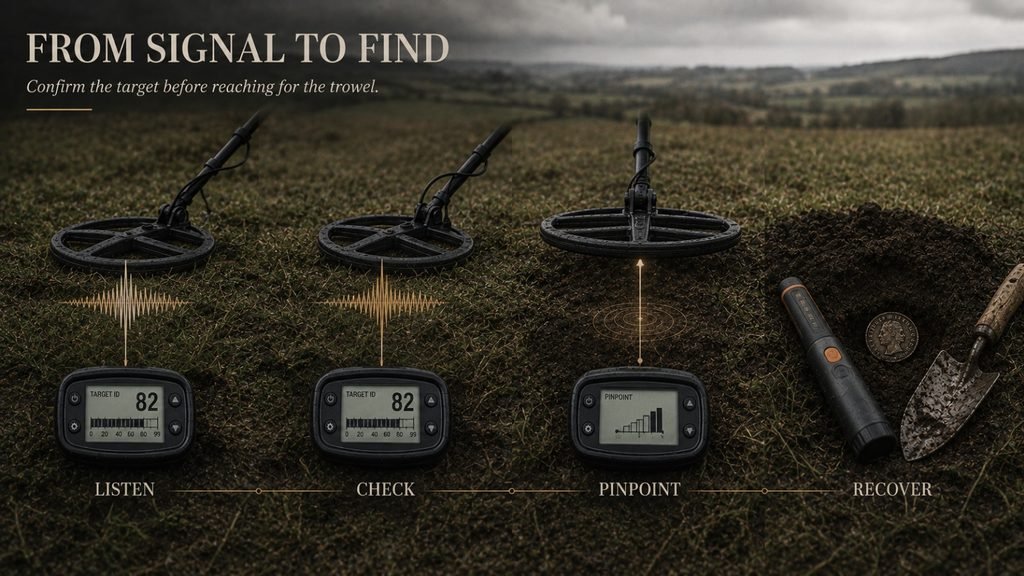
Once a signal sounds promising, the next job is to confirm it before cutting into the ground. A few seconds spent checking the response can save unnecessary digging and also reduce the risk of damaging a target that turns out to be shallow. The recovery process should begin only after the signal has been understood as well as possible.
Sweep over the target from two perpendicular directions and listen carefully to the tone. Check whether the target ID remains reasonably stable rather than jumping through the entire scale with every pass. A repeatable response from different directions gives much more confidence that there is a genuine object beneath the coil.
This is also the point to slow the sweep if the signal is unclear. A deep target, a small piece of metal, or two closely positioned objects may become easier to understand when the coil is moved more deliberately. Once the centre of the response is clear, pinpointing can make the recovery much cleaner.
Use pinpoint mode if the detector provides it. Pinpointing changes the way the detector responds so that the strongest part of the signal can be located more precisely, helping identify where the target is likely to sit beneath the coil. Knowing the approximate centre makes it easier to create a controlled hole rather than removing unnecessary soil.
A smaller recovery area also makes it easier to replace the plug neatly afterwards. That matters on cultivated fields, grassland, and public areas where good detecting etiquette includes leaving the ground tidy. After the hole is open, the final challenge is locating the object in the soil that has been removed.
A pinpointer can quickly tell you where the target is inside the hole or loose soil. Instead of searching through a pile of earth by hand, the narrow detection field lets you move directly towards the object and recover it with less digging. For information on pinpointers and other recovery equipment, the metal detecting accessories guide is a useful next resource.
This becomes especially valuable with small targets such as thin coins, buttons, jewellery, and fragments that can be difficult to see against dark soil. The main detector finds the target, while the pinpointer helps locate it once the recovery process begins. With that basic routine established, the next step is learning the unique language of the machine itself.
The fastest way to become comfortable with metal detector signals is to learn how one particular machine behaves rather than trying to memorise a universal chart. Target IDs and tones can vary between detectors, and even the same detector can behave differently in different ground. A simple test garden can turn those unfamiliar numbers and sounds into something much easier to recognise.
A small test garden can be made by burying several known objects at the same depth and then testing them individually. Useful examples include a 50p coin, a copper penny, an iron nail, a ringpull, a small gold-coloured earring, and a bronze item if one is available. Sweep over each object slowly and record the tone and target ID produced by that particular detector.
The value of this exercise comes from making the machine’s behaviour familiar before heading into the field. Published ID charts provide broad guidance, but a test garden shows exactly what the detector sounds and displays in the conditions being used. After a little practice, a number that previously meant nothing starts to become a useful clue.
Keeping a simple record of dug targets can make the learning process even faster. Write down the target ID, the tone, the approximate depth, and what was actually recovered, then look for patterns after several sessions. After enough digs, it becomes clear which readings on that particular machine and soil repeatedly produce coins, iron, foil, or other objects.
This is where experience becomes practical knowledge rather than simply more time spent detecting. A detectorist who knows that a certain slightly broken mid tone has repeatedly produced buttons or bronze objects will approach that sound differently from someone hearing it for the first time. The machine has not changed, but its language has become familiar.
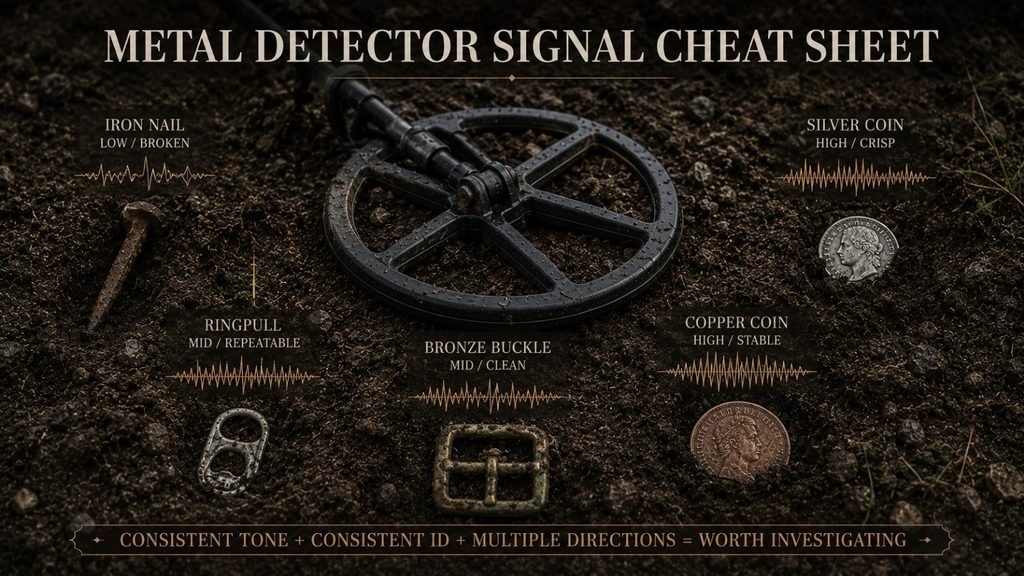
A quick signal reference is useful in the field, but the tone, target ID, consistency, and ground conditions should always be considered together. No single reading can identify a buried object with certainty. Use the following table as a starting point when deciding whether a signal deserves closer investigation.
| Signal Type | What It Usually Means | What to Do |
| Low grunt, stable | Iron nail or ferrous debris | Check for mixed signal; otherwise move on |
| Low grunt, one direction only | Iron at an angle | Almost certainly iron, move on |
| Mid tone, stable, repeatable | Bronze, brass, ringpull, or small gold | Investigate, worth digging |
| Mid tone, bouncing between low and high | Iron near a good target, masking | Worth digging carefully |
| High clear tone, stable, both directions | Silver or large copper coin | Dig |
| High tone, slightly broken | Deep coin, corroded coin, or two targets | Slow down and investigate |
| Signal disappears on second pass | Ground noise or tiny fragment | Move on |
| ID number jumps on every pass | Mixed signal or masking | Investigate or move on based on tone |
| Consistent ID, consistent tone, both directions | Genuine buried target | Dig with confidence |
The key pattern in the table is consistency. A clean response that remains present from more than one direction deserves more attention than a single loud beep that cannot be repeated. That simple rule can make signal interpretation much less complicated during a busy session.
Reading metal detector signals is not a skill that appears simply because a guide has been read. It develops through repeated sessions where tones, target IDs, ground conditions, and actual finds are compared with each other. Every nail, button, coin, ringpull, and unexpected object adds another small piece to the machine’s personal signal dictionary.
The most useful habits are simple ones. Slow down when a signal catches your attention, check it from different directions, pay attention to consistency, and remember that a target ID is a clue rather than a guarantee. A test garden and a field log can speed up that learning process because they turn random beeps into patterns that can be recognised later.
After enough time in the field, the machine starts to feel less like it is making noise and more like it is giving information. That is the real goal of learning how to read metal detector signals. The machine is always talking, and with enough practice, its language becomes much easier to understand.
Confused by Signals on a Specific Site or Machine?
Sometimes the signals genuinely do not make sense, and the reason is the ground rather than the technique. Highly mineralised UK soil, iron-dense farmland, and certain beach conditions can produce signal patterns that are difficult to interpret without experience. If a specific situation is consistently puzzling, the team at UK Metal Detectors is happy to talk it through and help work out whether it is a settings issue, a ground issue, or a machine capability question.
To read a metal detector signal, listen to the audio tone, check the target ID number, and test whether the signal remains consistent from different directions. Low tones generally indicate iron and ferrous targets, mid tones can indicate bronze, brass, aluminium, or small gold jewellery, while high clear tones can indicate silver or copper. The target ID provides another clue, but depth, soil mineralisation, target orientation, and nearby metal can change the reading. A signal that produces a similar tone and target ID from two different sweep directions is generally more worth investigating.
The numbers on a metal detector are target ID readings that indicate where a detected object appears to fall on the machine’s conductivity scale. On a 0 to 99 scale, numbers from 0 to 15 generally indicate iron and ferrous debris, while 80 to 95 can indicate silver coins. Mid-range numbers can represent several targets, including foil, ringpulls, bronze, brass, and small gold jewellery. Target ID numbers are only a guide because depth, mineralisation, target shape, orientation, and nearby metal can change the reading.
Metal detector beeps indicate how the machine is responding to a possible metal target beneath the search coil. A low grunt generally indicates iron or another ferrous target, a mid tone can indicate materials such as bronze, brass, aluminium, or small gold jewellery, and a high tone can indicate more conductive targets such as silver or copper. A broken or inconsistent beep can be caused by a deep target, corroded metal, multiple nearby objects, or ground interference. Checking the tone from different sweep directions helps determine whether the beep is likely to be a genuine target signal.
A metal detector signal is generally worth investigating when the tone and target ID remain reasonably consistent from more than one direction. Sweep over the target from two perpendicular directions and listen for a repeatable tone while checking whether the ID stays within a similar range. A stable response from both directions gives stronger evidence of a genuine buried object, although it cannot identify the object with certainty. Broken or mixed signals should not always be rejected because deep targets and iron masking can make potentially good finds sound less clear.
A metal detector signal can keep changing because of ground mineralisation, nearby iron, target depth, target orientation, or an inconsistent sweep. Mineralised soil can create background interference and shift target ID numbers, while an iron nail close to another metal object can produce a mixed signal that makes the ID jump between readings. Deep or awkwardly positioned targets can also produce weaker and less stable responses than shallow targets. Check the ground balance, keep the coil height and sweep speed consistent, and test the signal from different directions to help identify the cause.