
Picture the scene. You’ve been out for three hours, your knees are letting you know about it, and your finds pouch contains seventeen rusty nails, two bottle caps, and a ringpull with ambitious ideas about its own target ID. Somewhere in that same field, someone with the same detector and the same ground is pulling Victorian pennies and Georgian coppers, and the difference between their session and yours is not luck or experience or even the quality of their swing. It is their settings.
Discrimination is in that setting. It is the one that separates productive detecting from exhausting detecting, and the one that causes more confusion than almost any other aspect of the hobby because getting it wrong costs you in two completely opposite ways. Set it too high, and you walk past half your good targets without ever knowing they were there. Set it too low, and you spend your afternoon digging a detailed inventory of the last century’s agricultural waste.
This guide explains what discrimination actually does at a technical level, what those target ID numbers mean in practice, how notch discrimination works, why UK farmland presents a specific iron problem that changes the calculation, and exactly how to approach your settings for different types of detecting. By the end, you should be able to look at your discrimination settings with an informed opinion rather than a guess.
Discrimination is the filter between your detector’s coil and your ears. The basic idea sounds simple: it rejects certain metals and accepts others. The reality is more nuanced, and understanding the mechanics of it is what makes the difference between using discrimination well and being surprised by what it misses.
When your detector’s coil transmits an electromagnetic field into the ground, any metal object it encounters generates eddy currents, which are small electrical currents induced within the target. These eddy currents create their own secondary magnetic field, which is then detected by the receiver coil as it returns from the ground.
The return signal does not come back instantly. There is a slight delay between the transmitted field and the received response, known as the phase shift. Different metals produce different phase shifts depending on their electrical conductivity and magnetic permeability. Highly conductive metals such as silver and copper generally produce stronger responses, while iron produces weaker and more complex signals due to its magnetic properties. Aluminium and small gold items often fall within overlapping mid-range conductivity zones, which is why they can sometimes produce similar readings to common junk targets.
Modern metal detectors process these signal variations in real time, comparing them against internal reference patterns to generate target identification numbers and audio responses on the control unit.
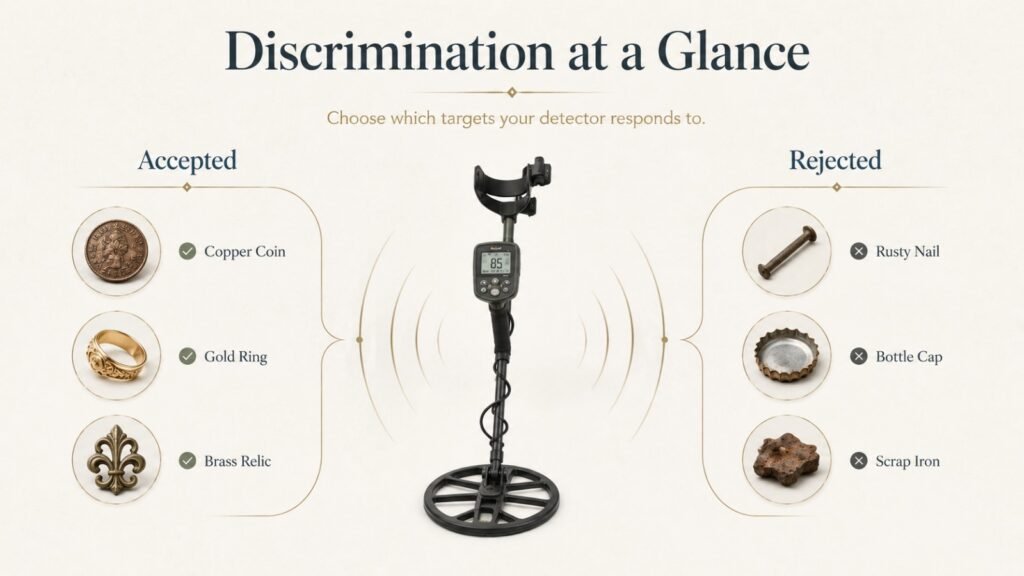
Discrimination is the setting that tells your detector which phase shifts to respond to and which to ignore. Set it to reject iron, and the detector sees an iron nail’s phase shift, recognises it as falling below the discrimination threshold, and stays silent. Set it to accept copper, and a penny’s phase shift triggers an audio response. The mechanism is a filter built around conductivity, with a line you draw across the scale: everything below the line is rejected; everything above it gets a signal.
Here is where most guides stop, and where the real complexity starts. Conductivity ranges overlap in ways that no amount of clever engineering has fully resolved. Small gold jewellery falls in a similar conductivity range to aluminium ring pulls. Some Roman coins read like iron. A hammered silver half-groat in heavily mineralised soil may read significantly lower than it should. Discrimination is not a magic switch that cleanly separates treasure from rubbish. It is a probability filter, and understanding the limits of that filter is what separates detectorists who find things from detectorists who miss them without realising it.
Knowing that discrimination works through a phase shift explains the principle. Knowing what the numbers on your screen actually mean tells you how to act on them.
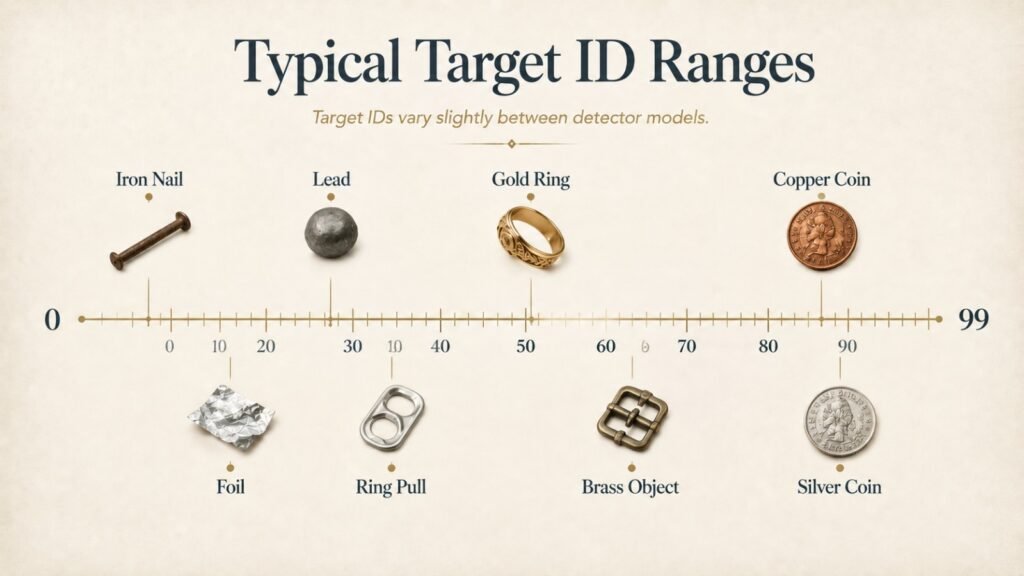
Most modern metal detectors display target ID on a numerical scale, typically 0 to 99, where the number represents the target’s approximate position on the conductivity spectrum. Low numbers indicate low conductivity: iron, steel, and small ferrous objects. High numbers indicate high conductivity: silver coins and large copper objects. The middle of the scale is where life gets complicated, and where the majority of interesting finds and frustrating junk both congregate. For the full science behind this, our technical explanation of how metal detectors discriminate goes into the underlying physics in depth.
These ranges apply across most modern detectors on a 0 to 99 scale, though individual machines vary by manufacturer and model:
| Target ID Range | Typical Objects |
| 0–15 | Iron nails, iron relics, most ferrous debris |
| 15–30 | Aluminium foil, small thin gold jewellery, lead |
| 30–45 | Ringpulls, small gold rings, and some Roman brooches |
| 45–65 | Brass, zinc, and some medieval copper alloy items |
| 65–75 | Copper coins, bronze objects, and large brass |
| 75–85 | Victorian and Georgian copper pennies, some gold |
| 85–99 | Silver coins (hammered and milled), large copper |
Target ID readings are not fixed, and treating them as absolute values is one of the more reliable ways to miss something significant. Depth reduces a target’s apparent conductivity. A silver hammered coin at 25cm may read 10 to 15 points lower than the same coin at 5cm. Soil mineralisation in iron-rich UK ground, particularly in Cornwall, Wales, and Northern England, adds noise to the signal that distorts ID accuracy. A coin lying close to an iron nail produces a confused, unstable reading that bounces between the nail’s ID and the coin’s ID, a phenomenon called masking that we’ll come back to when we get into the iron problem on UK farmland. Temperature, soil moisture, and even the angle of the target in the ground all affect what number appears on your screen. These numbers are guides and not guarantees, and learning to read signal behaviour alongside the number is where the real skill develops.
Understanding what discrimination does is one thing. Knowing which type your detector uses and which type suits your detecting style is where the practical choices begin.
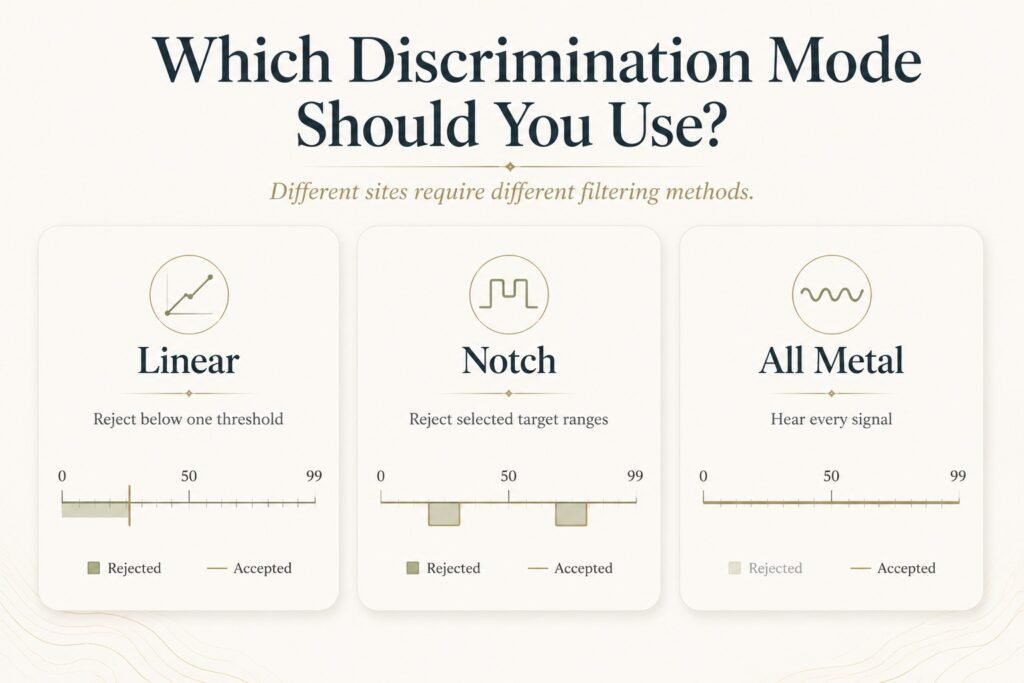
The simplest type: you set a single cut-off point on the conductivity scale, and everything below that point is rejected while everything above it is accepted. Set linear discrimination to 20, and you reject iron and foil while accepting everything from small gold upwards. Set it to 50, and you reject iron, foil, aluminium, and most mid-range targets, keeping only higher-conductivity finds audible. The advantage is simplicity, and for a beginner getting to grips with a new site, it is a reasonable starting point. The significant disadvantage is that it operates as a straight horizontal line across the conductivity scale. Raise the line to eliminate more junk and you simultaneously eliminate more good targets, with no way to open gaps in the middle. It is an effective starting point and a limited finishing point for anyone detecting varied UK ground.
Notch discrimination is the more sophisticated approach and the one that genuinely extends what is possible on a difficult site. Rather than rejecting everything below a single threshold, notch discrimination lets you selectively accept or reject specific segments of the conductivity scale while leaving other segments open. You can reject the iron range and the ringpull range while keeping everything else, including the mid-range where small gold sits, active and audible. A ringpull consistently reads around 33 to 37 on most machines. If your site is producing nothing but ringpulls in that range and genuine targets are reading above 40, notching out 33 to 37 makes practical sense. The critical point is that notch discrimination requires knowing your site, knowing your machine, and knowing what ID range your specific junk falls into, which comes from digging and recording over multiple sessions, not from guessing on day one.
All-metal mode turns discrimination off entirely, and the detector responds to everything the coil encounters. Most experienced detectorists reach for all-metal mode in specific contexts: relic hunting on historically significant UK farmland where iron targets themselves may be valuable, detecting in highly mineralised soil where discrimination becomes unreliable, and prospecting for gold in the Welsh or Scottish uplands where small gold nuggets can read anywhere on the scale. The depth advantage of all-metal is real and measurable. With no discrimination circuit processing and filtering signals, the detector runs at maximum sensitivity to all target types, which on deep targets in tough ground can translate to an extra few centimetres of reach. That sounds modest, but on a site where the good finds are sitting below the plough line, it matters.
Knowing the theory is useful. Knowing how to actually set your machine when you arrive at a new site is what takes that theory and turns it into finds in your pouch.
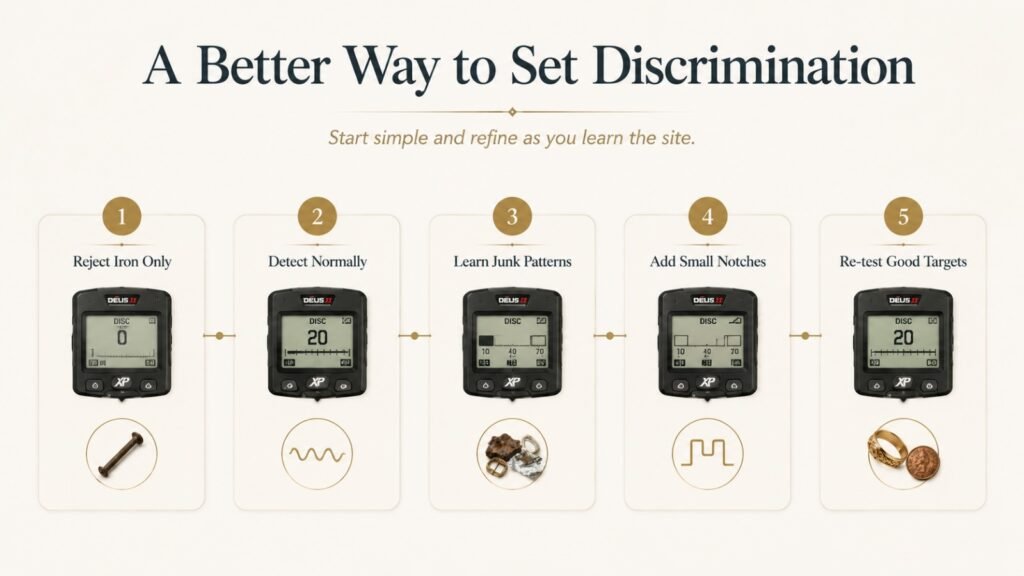
The single most consistent piece of advice from experienced UK detectorists is this: run less discrimination than feels comfortable, especially on a site you haven’t worked before. The instinct is to filter aggressively so that every signal is worth digging. In practice, aggressive discrimination means missing everything that falls in a suppressed range, and on UK farmland with centuries of mixed finds and mixed rubbish distributed through the same soil, those suppressed ranges are exactly where interesting targets sit alongside the junk. A practical starting point for UK farmland is to reject only iron, typically 0 to 15 on most machines, and dig everything else. This eliminates the most common, highest-density junk while keeping every other possible target audible. As you learn the site’s specific rubbish profile over multiple visits, you can add narrow notch rejections for whatever consistent junk is appearing.
Before relying on any discrimination settings in the field, set up a test garden at home. Bury known targets: a modern 50p, a copper penny, a ringpull, and a nail at around 10cm depth. Run your detector over each one with different discrimination settings and record what ID numbers each produces on your specific machine. This matters because ID numbers vary between manufacturers and even between models from the same brand. The only reliable way to calibrate your understanding of your detector’s language is to speak to it directly, with objects you know, in conditions you control. Fifteen minutes in the back garden tells you more about your machine’s actual behaviour than three hours on site guessing.
The process has a natural rhythm once you know what you’re building toward. Run your first session with minimal linear discrimination, reject iron only, and keep a written record of every target ID that produces confirmed junk. After 20 to 30 digs, patterns will emerge: your site’s most common rubbish will cluster around predictable ID ranges that you can see clearly in your notes. Apply narrow notch rejections only to those specific ranges where you are consistently digging confirmed junk, and after adding each notch, run a known good target over the coil to confirm it is not being accidentally suppressed. This last step is easy to skip and genuinely important. A notch that sits slightly wider than you intended can silence targets you would have wanted to find.
Every detector behaves differently depending on the machine, coil, and soil conditions. If you’re unsure how to set up discrimination, notch, or iron rejection for your specific setup, we can help you fine-tune it for better results in the field.
Contact us for expert help choosing the right settings and equipment.
The general principles of notch discrimination are straightforward. Applying them to the specific junk profiles that UK sites produce is where things get more interesting.
UK public parks, recreation grounds, and popular field margins are carrying an extraordinary density of ringpulls, the pull tabs from cans that have been scattered across British soil since the 1960s. They read consistently between 33 and 42 on most detectors. Small gold rings, the kind regularly recovered by UK beach and park detectorists, read between 28 and 48 depending on carat, size, and alloy. The overlap is real and significant, and no discrimination setting resolves it cleanly. The practical answer for most UK park and beach detectorists is to notch narrowly and reject the very centre of the ringpull range (33 to 37) rather than the whole suspected zone and accept that some borderline signals will still require a dig and a judgement call. A signal that bounces between 28 and 38 on every pass is worth investigating. A signal that reads 35 repeatedly and consistently on every sweep is more likely to be your next ringpull.
On UK beaches, saltwater mineralisation in wet sand produces conductive interference that causes ID numbers to shift and stabilise less reliably than on inland soil. Many experienced beach detectorists run with minimal discrimination for exactly this reason. An aggressive notch that worked well on dry sand above the tide line starts misidentifying targets once the salt content of the ground rises beneath the coil. On Crown Estate foreshore with high salt mineralisation, the most reliable approach is often to reduce discrimination to iron-only rejection and rely on signal consistency rather than the specific ID value to make dig decisions. A signal that reads the same number on every pass from every direction is worth more confidence than an absolute ID number on the ground that is actively shifting the readings.
The challenges of discrimination on beaches are manageable with adjustments. The iron problem on UK farmland is a different category of difficulty, and one that every detectorist who works arable ground needs to understand properly.
British agricultural land has been farmed continuously for between 500 and 2,000 years. That means multiple centuries of iron tools, nails, horseshoes, harness fittings, wire, agricultural machinery fragments, and fence staples distributed throughout the topsoil and below it. Annual ploughing moves it all upward and redistributes it across the field. On heavily worked UK arable land, it is not uncommon to encounter 50 iron targets for every non-ferrous target, and in areas near former farm buildings, that ratio is worse. The instinct is to run aggressive iron discrimination to filter out the noise. The reality is that doing so costs you finds in ways you cannot see — which is the most frustrating kind of loss. The best places for metal detecting in the UK vary considerably in their iron density, and understanding what you’re working with before you set your discrimination is part of preparation.
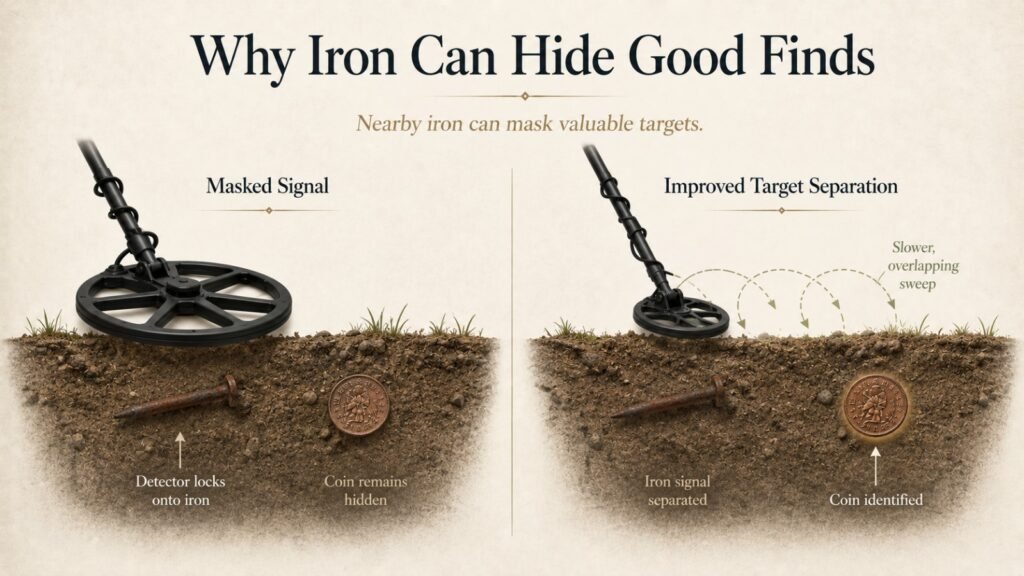
High iron density creates a specific detection problem called masking, and it is one that discrimination settings cannot directly fix. When an iron object is physically close to a good target, the iron’s signal can dominate the coil’s return, suppressing the good target’s response entirely. A Victorian penny sitting 15cm from a horseshoe nail may not register at all because the nail’s stronger iron response is drowning out the coin’s signal. Running high discrimination doesn’t resolve masking. It simply means the targets you do hear are the ones that iron hasn’t already buried. The real solutions to masking on iron-dense UK farmland are slower sweep speed, a smaller coil for better target separation between adjacent objects, and the discipline to investigate broken, choppy, unstable signals that might indicate a good target sitting near iron rather than dismissing them as noise. This is also where understanding metal detector ground balance becomes directly relevant: ground balance and discrimination work together on mineralised UK farmland, and optimising one without attending to the other leaves performance on the table.
On sites with known historical significance, iron signals deserve investigation rather than dismissal. The PAS Code of Practice for Responsible Metal Detecting encourages detectorists to record finds of all types, and many historically significant objects from a field near a Roman road, a site adjacent to a medieval settlement, or land near a Civil War engagement are iron. Roman military equipment, medieval tools, and Civil War artefacts all fall into the iron range that aggressive discrimination silences. Running all-metal mode or using a detector’s iron audio function a distinct tone for iron targets rather than a complete reject response on historically significant sites ensures you hear iron signals without committing to digging every one. The decision to dig is still yours. The difference is that you’re making it, not your discrimination setting.
Everything above has been building to this, which is the most counter-intuitive insight in the whole subject of discrimination settings.
The detectorist who filters aggressively comes home with a cleaner finds pouch and a sense that the field didn’t have much in it. The frustrating reality is that high discrimination doesn’t only reject rubbish. It rejects anything in the same conductivity range as that rubbish, which includes a significant portion of the finds you actually want. Small gold jewellery reads in the 28 to 48 range on most machines, which is exactly where aluminium foil and ringpulls cluster. A medieval bronze brooch reads between 45 and 65, overlapping with modern bottle caps. A thin, worn hammered silver half-groat at depth reads lower than a fresh surface coin of the same type, potentially well below the threshold a new detectorist would set to avoid pennies. The UK’s most historically productive periods, Roman and medieval, produced small, thin objects that often read below the discrimination thresholds new detectorists are tempted to set.
Run the minimum discrimination that makes your session manageable, not the maximum that makes it comfortable. Comfort comes from digging less. Finds come from discriminating less. The two are genuinely in tension on every session, and every experienced detectorist chooses a point between them that suits the site they’re on and the targets they’re looking for. The closer you stay to all-metal, the more you dig, and statistically, the more you find. That is not a comfortable truth for anyone who has spent four hours digging bottle caps. But it is what the numbers support.

| Location | Recommended Approach | Reason |
| UK arable farmland | Reject iron (0–15) only | High finds density across all other ranges |
| Historically significant sites | All-metal or iron audio | Iron relics and iron-masked good targets |
| Public parks | Reject iron + narrow ringpull notch (33–37) | High ringpull density but gold overlap risk |
| UK beaches (dry sand) | Reject iron (0–15), minimal notching | Modern jewellery clusters in mid-range |
| UK beaches (wet sand/foreshore) | Minimal discrimination | Salt mineralisation destabilises IDs |
| Mineralised UK upland ground | All-metal or reject iron only | High mineralisation reduces ID reliability |
Discrimination doesn’t find things for you. It helps you manage your time and your session, and getting it right means something different on every site you detect. The detectorist who pulls the most interesting finds from UK ground is rarely the one with the most aggressive settings. They are the ones who have spent enough sessions learning their machine’s behaviour, their site’s rubbish profile, and the specific ID ranges where their most common genuine finds sit.
The settings that work on a dry beach in Kent are wrong for iron-heavy arable ground in Shropshire. The settings that work on low-mineralisation East Anglian farmland are wrong for sites near medieval settlements where iron signals deserve a second look. Getting this right for your specific machine, your specific ground, and the specific targets you’re after is the ongoing work of the hobby, not a problem solved once and forgotten. Once you do start pulling the right targets, our guide to what to do when you find something metal detecting UK covers exactly what comes next, from field to Finds Liaison Officer.
If you’re serious about improving what you recover, your settings matter just as much as your detector. A small adjustment can completely change what your machine is seeing in the ground.
Contact us to optimise your detector setup today.
Discrimination is a setting that filters metal targets based on conductivity and phase shift. The detector analyses the signal returned from a buried object and compares it to a set threshold. Targets below the threshold, usually iron and low-value metals, are ignored while higher-conductivity targets produce an audio signal and target ID. Because metal conductivity ranges overlap, discrimination works as a probability filter rather than a perfect separation system.
Start with low discrimination and reject iron only, usually around 0 to 15 on most detectors. Learn your site first before adding any extra filters. Record target IDs from your early digs to identify junk patterns. After several sessions, you can notch out only the repeat junk ranges. Always test known good targets after changing settings to avoid blocking valuable signals.
Notch discrimination allows you to reject specific target ID ranges instead of blocking everything below a single level. This helps remove common junk like ring pulls while keeping other ranges open. It is useful on UK sites but works best once you understand your site’s target ID patterns.
Low discrimination is better for most UK sites. High settings remove junk but also block valuable targets like small gold, hammered coins, and bronze artefacts. Using minimal discrimination helps you find more targets and reduces the risk of missing good signals hidden in overlapping conductivity ranges.
Yes. Higher discrimination can reduce depth because it filters weaker signals before they are fully processed. This is more noticeable in mineralised UK soils. Lower discrimination or all-metal mode often gives better depth and improves detection of deep or faint targets.